RECIPES
Here are some recipes that used to be part of my old blog page which is now deleted. I’ve also included some comments from the old blog at the bottom of this recipe page.
NO KNEAD PIZZA DOUGH

This no knead pizza dough is not really something you can’t figure out without me, but I can share some tips to make some great pizza dough without kneading it and making a mess out of everything.
Don’t have an expensive stand mixer or too cheap to buy one? Then use a mixing bowl and a tablespoon. I will show you how it’s so easy!
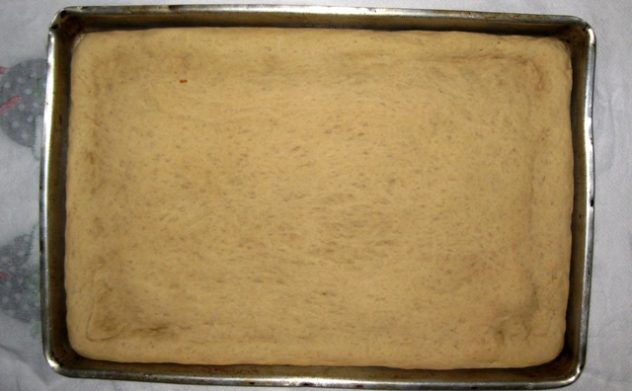
I tried something new the other day. I made a Sicilian Pizza with medium crust.
Medium is suggested because it definitely wasn’t thin crust but at the same time not as thick as the Sicilian crust I usually make. How did I do this? I used 3 cups of flour instead of 4 cups. It came out perfect actually!
You can use a strong metal tablespoon with this no knead method. It’s great if you don’t want to get your counters or hands dirty when making the pizza dough. If this sounds good to you then you should love this method! The dough came out smooth and perfect. The end result was a Sicilian Pizza just like the restaurants serve but with the crust just a hair thinner. It gave it a nice crunch while maintaining plenty of thickness.
Only a Few Kitchen Tools are Needed for Pizza Dough without Kneading
You will need for No Knead Pizza Dough:
- Measuring spoons and measuring cups to measure out your ingredients.
- A large “strong” tablespoon that won’t bend (or also the handle of a large serving spoon).
- A large stainless steel, aluminum, or glass mixing bowl. As long as it’s round and large that’s most important, so dough won’t get caught in corners. And made sure the inside if smooth without etched designs.
- Either a large oiled or greased pot with a lid or bowl to place the dough into when it’s done being mixed, so it has time to rise and double in size without it sticking to the container.
STEPS
The whole process of mixing up the dough with a spoon shouldn’t take longer than around 7 minutes or so.
For Making the no knead pizza dough
INGREDIENTS for Pizza Dough without Kneading
- Approx: 2 or 3 teaspoons instant dry yeast or rapid rise dry yeast
- Approx: 3 cups Italian “00” flour
- Approx: 1.5 cups of water (added half at a time when mixing)
- Approx: 2 teaspoons salt
- Approx: 2 teaspoons sugar
- Approx: 2 Tablespoons of Olive Oil
Please note these measurements above have a ratio that is very high in water compared to a usual recipe for two reasons.
- That if you want lighter and airy crust you should always use enough water where the dough is more on the wet side than the dry side.
- To mix the flour and water with a spoon only without having to knead with your hands read on. You will need to add as much water to the flour as possible to get things mixed up well. To make this as easy as possible I used this ratio, 1 cup of flour to 1/2 half cup of water. And the dough came out perfect! It was light and airy with air bubbles in the crust as you’d get in any good pizza shop that serves Sicilian Pizza!
Caution
Do not stretch the dough in the air by picking it up, when making a Sicilian Pizza or deep dish style pizza. Instead you will press it down into the pan until it is formed and will be very elastic bouncing back for the first few minutes but don’t give up. It will eventually get tired of fighting with you and go back to its original shape. Do not make this too thin. 3 cups of flour worked for me because I was careful not to make the dough too thin. It’s probably much better to use 3 and 1/2 cups flour and 1 and 3/4 cups water, or even 4 cups flour and 2 cups water. Don’t worry about the exact measurements. When making bread or pizza dough you can always sprinkle a little more flour into the dough batter to make it a little drier if it gets too wet or too sticky.
Remember that this dough is supposed to be on the wet and sticker side so that you can mix it easily with a spoon instead of your hands, so don’t worry.
The Pizza Dough Texture
This dough should be between the texture of a regular dough and a cake batter. It will look like it is going to stick to the mixing bowl when getting ready to pour it into the baking pan, but with some help of that tablespoon to help it along while turning the bowl upside down it should come out gradually but completely. Just don’t break it. Keep it in one whole piece while you use the spoon to loosen all edges will it’s sliding out of the bowl into the pan.
You can also use your regular favorite pizza dough recipe and get your ingredients ready.
I will post the basic ingredients and measurements required for making Sicilian Pizza dough below at the bottom of this tutorial.
- In a small cup or bowl mix half of the lukewarm to touch water (about 3/4 cup) with 2 or 3 teaspoons of yeast. Let it proof and get foamy for 10 minutes.
- Use a large mixing bowl mix well the flour, salt and sugar.
- Add the lukewarm water (3/4 cup) containing the yeast with 2 tablespoons of olive oil and mix well for a minute or less.
- Now add the rest of the water (3/4 cup). This water should be room temp or cold.
- And mix the dough for about 6 – 8 minutes (or longer) until smooth without lumps.
- The dough can be a little sticky but not too sticky. You should be able to loosen from the sides of the mixing bowl with the help of the spoon. The drier the dough the easier it will be to remove, but the dough will be usually too tough and hard on this pie, so stay on the stickier side to achieve a moister and airier crust.
- When the dough is thoroughly mixed without lumps place it into the another bowl or pot that’s oiled to keep it from sticking.
- Then cover the bowl or pot and let it rise for about 90 minutes to hours or until it’s doubled in size. Whatever comes first.
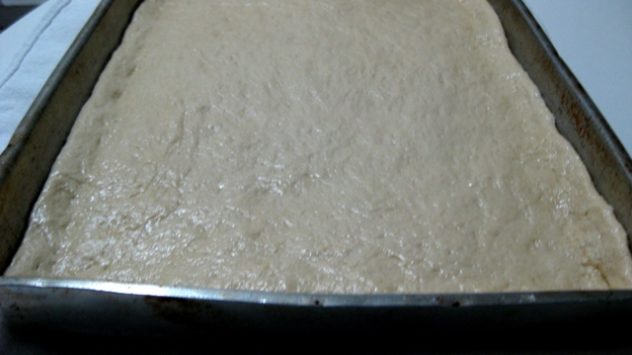
- Transfer the dough to a lightly oiled pan and press it down to form to the shape of the pan. It will take a good 5 to 10 minutes to do this. The dough will be elastic for the first few minutes then start to form better. Don’t pick it up and don’t make it too thin. Better to have it not get too thin and also not reach the edges than to get too thin since this is a thick crust. You can make a little border line for future assembly indented with your fingers to keep the sauce from escaping and running down the sides. Let the dough rest for about 30 minutes until it gets puffy looking. Cover it and do not touch it.
- Take a peak and when it’s risen a little then you can start to pour the sauce over it and add your cheese. See pictures.
- Congratulations, you’ve just made your simple but delicious no knead pizza dough and it’s ready to be baked.
- I double bake the dough. Once before adding the sauce and cheese then once after. Only about 7 minutes the first time though.
- After baking the dough at around 475 F /245 C for about 7 minutes. Remove and let it cool on top of the stove for 15 minutes at least before placing the sauce and cheese on top. Do not turn off your oven while the crust is cooling.
- Now you can add about 12 ounces of sauce, 3 ounces of grated Pecorino Romano Cheese, and about 12 ounces of Mozzarella Cheese.
- Bake for about 15 to 2o minutes checking on it after about 12 minutes. Do not burn the cheese. A few brown spots are okay and can be a good warning signal that it’s done baking.
- Remove from oven and cool on the stove top while it’s still in the pan.
- After about 7 minutes you can try to break the edges and corners free from the pan using a butter knife or thin flat metal spatula. Use quick jabs and you should hear it crack off of the sides if the pan was oiled on the sides before you baked the pizza.
- Cut into 12 squares and enjoy!
This may sound complicated but it’s not. The process is fun and easy after you do it once you should learn from your mistakes if you’ve never baked a pizza.
Tips during the mixing process
Wasn’t this simple? If not you’ll definitely need some more practice, because this should be pretty easy to do.
You’ll need to hold the bowl firmly with one hand while the other hand, your strongest one, mixes quickly and scrapes all the little pieces of flour that stick to the bottom and sides of the bowl.
Hope this no knead pizza dough tutorial helped you!
WANT MORE HELP?
Buy my cookbook. There should be plenty more tips in it, plus many of great Italian favorites including several desserts. It comes in both digital e-book format and paperback.
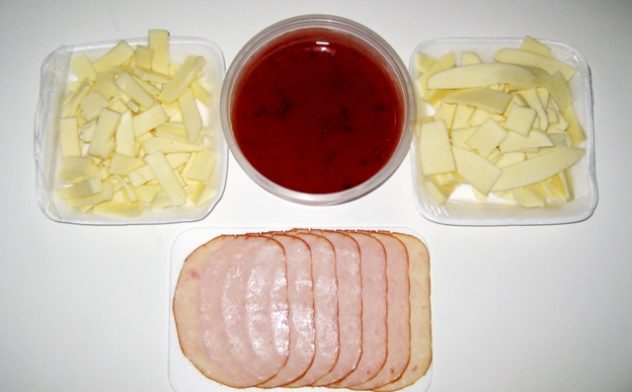
BRAZILIAN, SICILIAN TURKEY PIZZA
Hungry? This Pizza Should Satisfy the Hungry!

I don’t make this pizza too often because it’s got Sliced Deli Turkey Meat on it, and as you probably know, deli sliced meats have nitrates or other artificial preservatives that aren’t so great for us. But this Turkey Pizza rocks! And I guess a little once in a while won’t hurt.
Now if you prefer a healthier pizza, you can use switch the meat to any other organic free range raised meat. For example, you can totally change the flavor of this one from a salty turkey flavored pizza to another type of flavor for example like a BBQ Chicken Pizza instead. To do that all you’d need to have is some freshly cooked, diced chicken breast and have some BBQ sauce on hand. Then you’d just drizzle a little BBQ sauce directly on top of the chicken pieces only and it is delicious. That’s what I call my Sicilian BBQ Chicken Pizza, which is also good.
But I think you should try this BRAZILIAN SICILIAN TURKEY PIZZA first! The last few times I made this I changed it up a little bit. Instead of the olives I made it taste more like a fake Canadian bacon and pineapple just by using the turkey with pineapple. You almost couldn’t taste the difference.
Click to see the whole assembly process with detailed pictures
This One will Satisfy a Family of 4 Very Hungry Humans
Three pieces of this pizza per person should do the trick. I actually can eat 4 slices without a problem when I’m very hungry, but that’s just me. I love Pizza, and can put it down quickly.
If you don’t know how to make pizza dough for a pizza then you can get either online somewhere or from my cookbook called “Italian Cookbook of Famous Recipes” and all of the details are there on how to make a regular Sicilian Pizza. Then just follow these pictures and layers of ingredients here.
Just know this one thing. If you use deli turkey meat, the end result of this pie will be a little on the salty side. That’s a good thing. You can always balance that out by adding something sweet or pineapple like I have done recently.
Just remember not to add too much turkey. And also remember that you do “not” want to add regular fresh turkey. You want the deli sliced turkey meat for this one since it has a salty flavor and get it sliced thin.
So “do not” put extra salt in the sauce or on top of the pizza. You can always add it later when it’s finished if you like. You can however drizzle a little sweet tasting olive oil on top as a final topping before baking this.
Also, I would pass on the idea of using smoked flavored deli turkey meat because it was overkill when I made it once and I didn’t like the flavor. Trust me that the Smoked Turkey meat for this recipe was a little too rich in flavor. It seemed to overpower all the other flavors. So you don’t have to learn the hard way like I did.
The regular deli turkey flavor should blend well with the flavors in this pizza. Some examples of the regular turkey meat that should be good for this recipe are: Oven Roasted Turkey, or Honey Baked Turkey. They are not smoked and should both be fine.
Last precautions:
1) Do not put too much stuff on top of this pizza. Little is better when making pizzas. Too much on top, then everything may not cook all the way and you can’t cook this too long because the bottom can burn. So have a light hand except for the sauce and cheese.
2) Don’t lift up the the pizza into the air when halfway baked like I did in the pictures below.
Why? Because it tends to crack the pizza and when it’s time to put the sauce on it will leak through the cracks. You will see little black burn spots in the final picture due to the sauce burning the pan.
3) If using two layers of Mozzarella Cheese like you see in the pictures below, then divide the cheese into half before laying it down. Everything should be on the thin very thin or light side since you are building many layers.
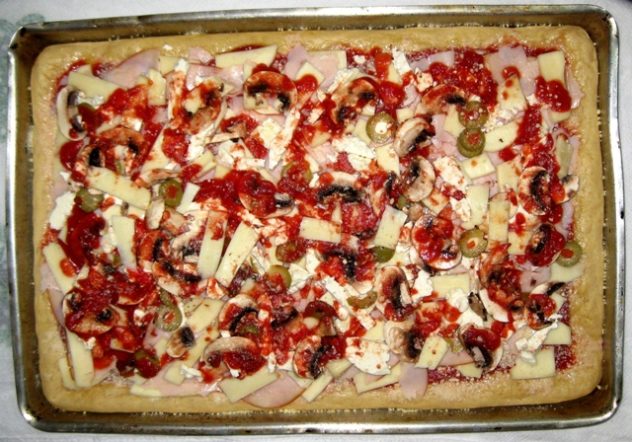
Basic ingredients used for this Sicilian Turkey pizza are: dough, turkey, sauce, Mozzarella Cheese, and then you can use grated Pecorino Romano or Parmigiano-Reggiano or a regular Parmesan cheese. Percorino is the preferred and traditional cheese for Sicilian Pizza. Then second choice would be the Parmigiano-Reggiano.
Anything else you’d like to add is up to you. Lately with this turkey pizza I use pineapple now and skip the olives mushrooms and feta.
You can also do what I do which is: make half with turkey and pineapple and the other half with some mushrooms.
Things used for toppings or flavors:
Grated Cheese, Mushrooms, Feta Cheese, Olives (you can leave the olives off if you don’t want this too salty or tangy!) The turkey meat adds plenty of salty flavor and you may not want more.
I do not add olive oil anymore to pizza until the last 2 minutes of cooking. I use it drizzled lightly as a finishing touch now only while the pizza is still bubbly hot.
You will need to coat the pan and dough however with some cooking oil like sunflower, safflower, or similar, which is less bitter since it soaks into the dough
THE STEPS
- Make your dough
- Then let it rise
- Then press the dough into the lightly oiled square baker’s half sheet pan, and form the shape. Make sure you have at least a half inch tall border higher than the rest of the dough. You’ll need this to hold the sauce inside. See the pictures below for each step.
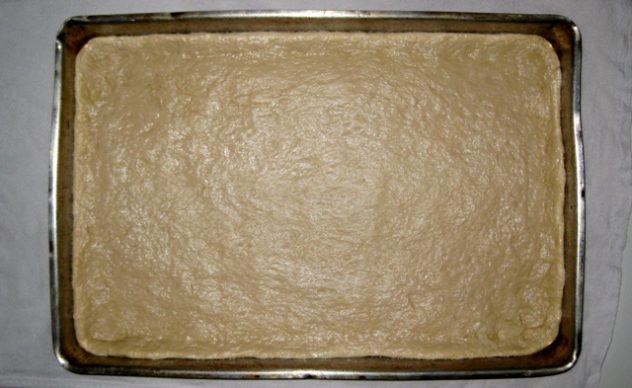
- After it is perfectly formed do not touch it again unless you have to fix a corner or side that pulled away from the pan.
- Then let the dough rise again in the pan until it gets puffy. Do not touch the dough.
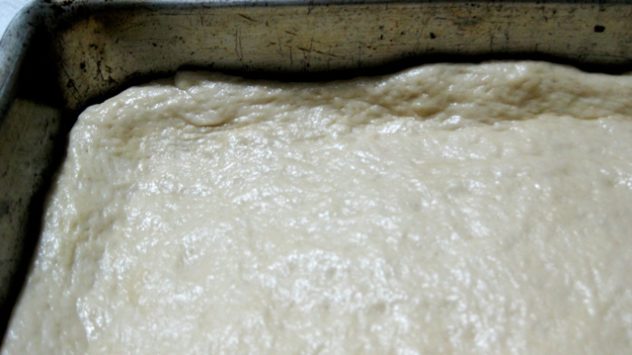
- Half bake the pizza dough for about 12-14 minutes at about 350-375 F. SEE PICTURE BELOW SHOWING THE DOUGH COOKED AFTER ABOUT 14 MINUTES.
- Do not check the bottom of the pizza as I have done in this picture. You’ll see that it’s a very light golden color it’s time to remove the pan from the oven to let it cool for about 30 minutes. THERE IS NO NEED TO DO THIS!) I recently checked the bottom of the dough and it must have make a small crack in the center where I bent it and sauce leaked through the bottom. You can however loosen the edges with a butter knife but I don’t recommend lifting it up anymore. So don’t do what you see me doing in this picture! I just left the picture here so you can see what the bottom looks like after about 14 minutes or so.
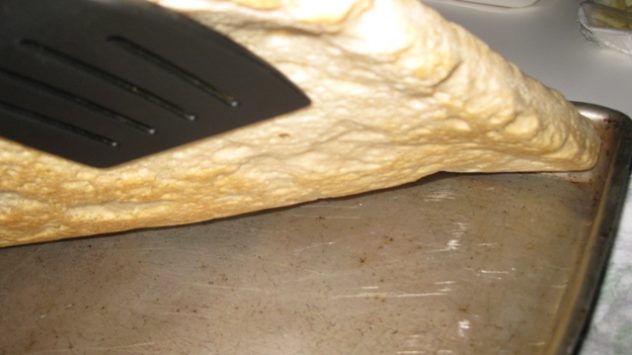
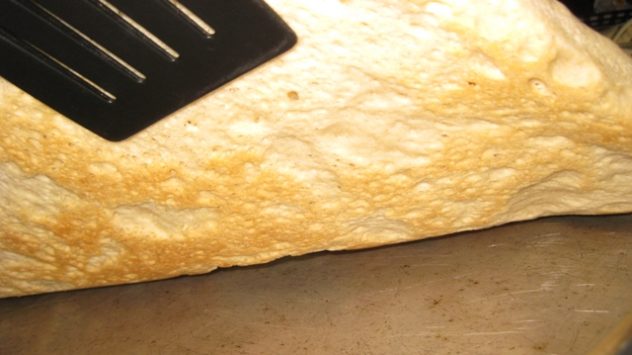
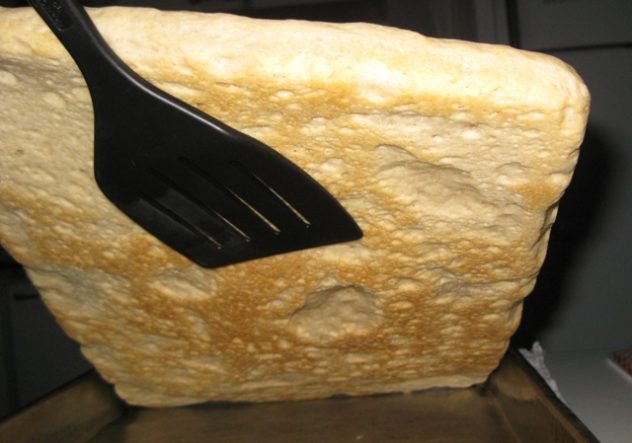
You can “gently” loosen the edges and corners of the pizza with a spatula. A thin flexible one is best. But like I said in step #7 that is all I recommend doing. DO NOT lift it up not even the corners because they can crack then lots of sauce will escape and burn the bottom of the pizza. This picture now is to show you what not to do!
But do not take the pizza out of the pan and “do not lift it up too high” like I did in this picture.
I did that just to show you what it’s supposed to look like. If you do this the center of the pizza will crack and lots of the sauce will leak through the center and make the crust soggy and “burn” the bottom. Ask me how I know this. You are just going to lift up one or two corners just enough (like 3 inches) to peak under to see if the bottom looks like this.
After the pizza is cooled for about 30 minutes you can assemble the layers.
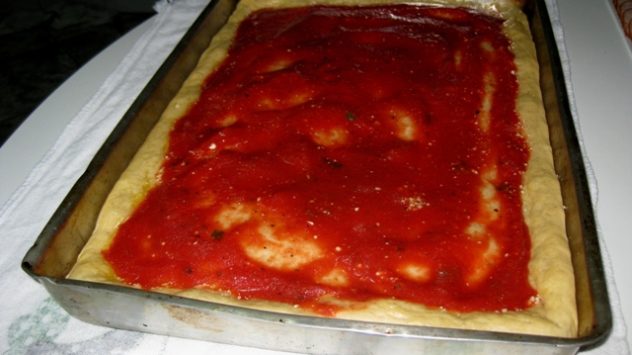
8. Place your sauce down like this. Be generous this is a Sicilian Pizza.

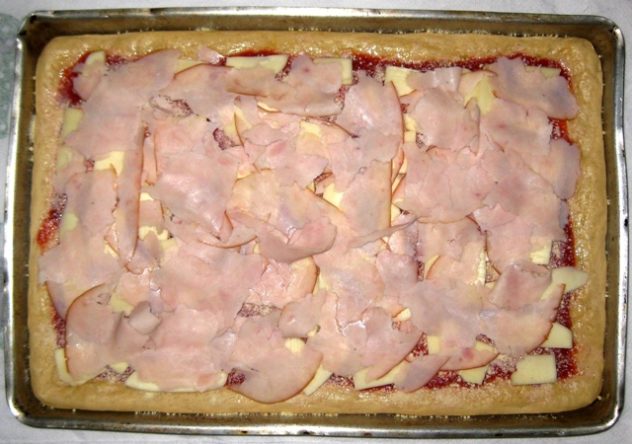
9. Sprinkle generously some grated “Pecorino Romano Cheese”, like I said before which is the traditional and preferred grated cheese for this pizza pie. If you can’t find it in the store, you can use some Parmigiano-Reggiano Cheese instead or a combo of both. Sometimes in stores you can find the combo pre-mixed and grated already in a bottle. I like using fresh grated cheese. They even grate it fresh for you in some stores and pour it into a to-go container. Now that’s some good service. After the grated cheese is on the sauce then you add your Mozzarella on top of that as show in picture below.


10. Next a “thin” layer of the turkey. Make sure it’s paper thin. It’s more for flavor than anything.

11. Next a little more Mozzarella Cheese.
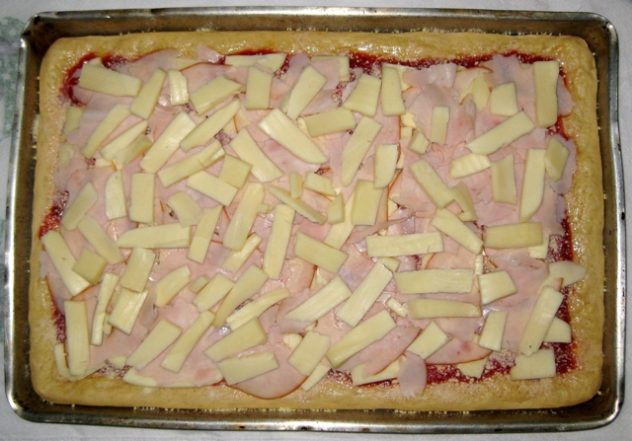
12. Next some toppings. I choose a couple handfuls of some freshly slicked mushrooms, and just a few thinly sliced green olives sprinkled around. And then topped with a few spoons of sauce and then finally a light sprinkle of some more grated cheese.
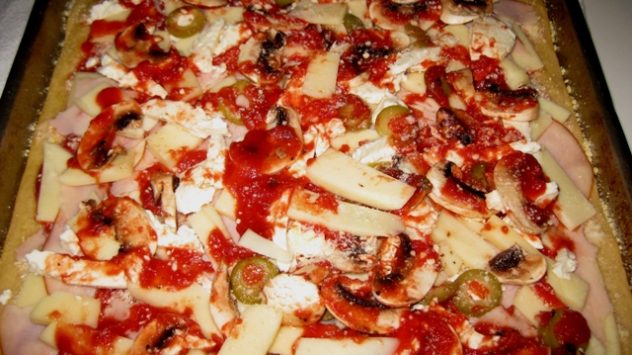
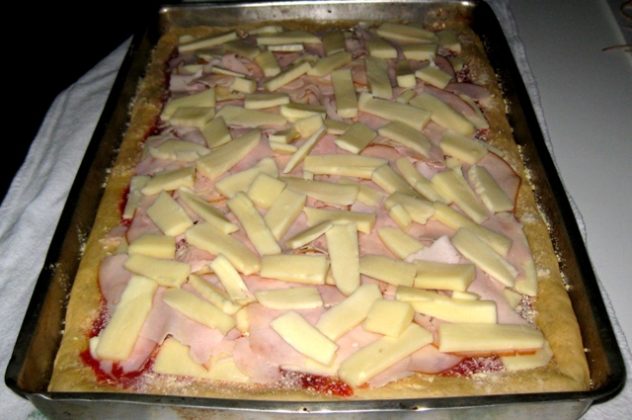
13. Next bake for about 20 more minutes at the same temp until the cheese is well melted as in this picture. Do not burn the cheese. If you burn the cheese the pizza is ruined. A couple of golden brown spots as shown in this picture are perfect. Any more than that will dry out the cheese and possibly overcook or burn the bottom crust of the pizza.
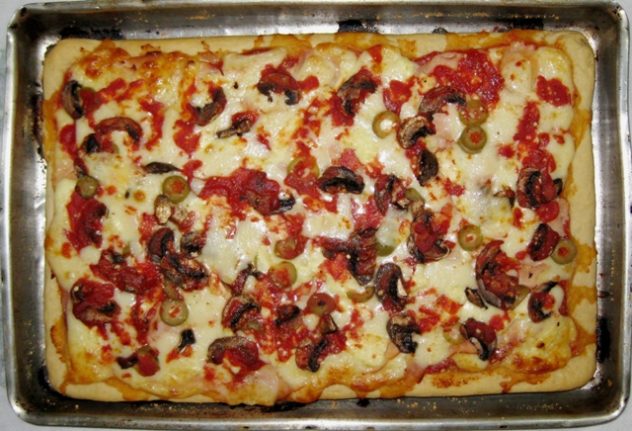

14. Cut into 12 big slices, serve and enjoy!

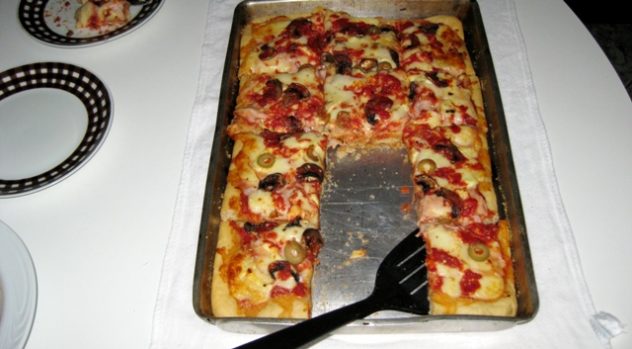
If you don’t finish this large pizza or you are a slow eater and it gets cold just reheat the slices in either a toaster oven or place a slice or two onto aluminum foil and place back in the oven for 5 to 10 minutes.
Don’t use a microwave to reheat slices of this pizza you worked so hard to make. It will make it soggy!
Hope you enjoy this as much as we do.
Any questions or comments? Feel free to post them here.
VEGETARIAN BAKED BEANS RECIPE
It’s fun and easy to make baked beans with this great vegetarian baked beans recipe.
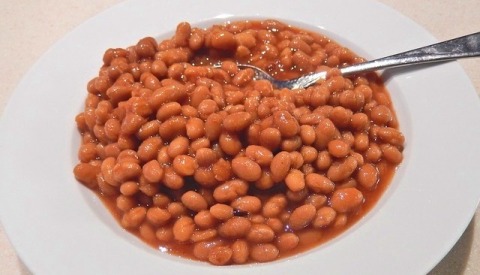
Here is a simple recipe I came up with that tastes better than the real thing and I didn’t even have to use molasses. This delicious homemade vegetarian baked beans recipe takes only about 45 minutes. It’s great for a summer BBQ or the 4th of July. You can use either canned beans or cooked. For the quick fix 45 minute recipe you’ll need the ingredients below along with a couple of cans of beans. Or use as many cans as you like depending on how many people you will feed.
If you have extra time you can cook some dry beans that come in a bag but it takes much longer of course, about 2 to 3 hours total time instead of the 45 minutes.
Either way you won’t have to go to the store to buy those mass produced baked beans, especially on a holiday with long lines. You may find these to be more delicious than the Good ‘Ol canned stuff anyway. With this meatless homemade vegetarian baked beans recipe you probably won’t even know they’re vegetarian because they taste probably better than the beans made with meat or pork fat.
What you’ll need:
A medium or large stainless steel pot
And a large spoon to stir with
Notes:
- I prefer using a good stainless steel pot it’s much easier to cook with and easy to clean.
- For this recipe I won’t tell you exactly how much of each ingredient to add. But don’t worry for this one it doesn’t need to be exact and you can customize this to your taste.
- If using the dry beans you will want to make sure that they are cooked about 85% % of the way before adding the rest of the ingredients below to the pot.
- If cooking the dry beans yourself you will want to cook them according to the instructions in plenty of water for the time suggested.
- I’ve made these many times and they come out great each time no matter how I change the recipe around. So that’s why I tell you to customize it the way you wish.
- When using precooked beans in a can, you can just heat them up for a few minutes, then and add a little extra water (about 4 ounces) and give them a stir when they are hot before adding the ingredients.
- Now I have to say that when I make vegetarian baked beans I love making them from scratch the long way. I choose a very small Brazilian red bean that only takes about 75 minutes to cook before I add the ingredients to the pot.
- You will save a lot of time though using the already cooked canned beans. I’m sure the flavor will still be delicious because of all the other great ingredients you’ll be adding and the cooking time to blend everything together is only about 45 minutes. And if you’re in a hurry then this is the way to go.
- Be careful when adding the sugar and spices. Add a little at a time is better, and you can always taste the beans every so often to see what they need more of while they cook.
- You’ll be cooking the beans with the ingredients as long as it takes to create a nice thick liquid with all of the flavors blended together. Usually about 35 to 45 minutes. They can cook a little longer but it’s probably not necessary.
- Play around with this vegetarian baked beans recipe and tweak it until you get the perfect flavor for your taste.
- You can add molasses if you like but I didn’t and without it the beans tasted so good. I may try in the future but I don’t see that it was needed.
- Adding a drop of honey may taste good, but I didn’t put any in. It may enhance the flavor a little bit though. If you do make sure it’s “real” honey. There is a lot of fake honey sold on the market today! Too much actually on grocery shelves in American stores actually. Know your source or it is watered down with sugar or other syrups!
- Remember, this is an easy recipe so don’t stress over it. You’re just heating up some already cooked beans with the flavors of spices and ingredients you like.
- The beans usually used by companies that make baked beans are Navy beans and they’re white in color. But use any you like.
- I do NOT recommend black beans, garbanzo beans, lentils or peas for this dish.
- I love the flavor of a small red bean, but you can use whatever you have.
- When using the dry beans that take a while to cook, you can add the ingredients when the beans are about 75% cooked. This will save you a lot of time!
AFTER THE BEANS ARE COOKED THEN YOU CAN ADD THESE INGREDIENTS
INGREDIENTS:
IF USING A CAN OF “COOKED BEANS” CAN JUST HEAT THEM UP FOR 4 MINUTES BEFORE ADDING THE INGREDIENTS BELOW
- Water (Important): Always keep the beans covered by at least 2 inches of water except for the last 15 minutes or so. Taste the beans while they’re about halfway done cooking to see when they’re about 75% done. Make sure that they are generously covered with water and always add some water as needed. You will need just enough water to cover the beans by about 2 inches. After the beans are a little more than halfway cooked you can add all the ingredients. While simmering on low for a little while you will see this transform into a thick soupy like liquid. You can always add more water as you cook later when needed so they won’t get too dry and burn at the bottom. Always stir the beans at bottom every 10 minutes. Beans are a thick protein skin and can easily burn on the bottom of the pot, especially when they are almost done cooking! Water and frequent mixing protects them. If you chose to cook the “dry” beans, after about 90 minutes you can usually add all the other ingredients to the pot. Just always keep an eye on the water level. Do not add water to the beans when they are almost done. You will need to make sure that the liquid is thick enough but not too thin.
- Brown Sugar (about 1 or 2 tablespoons)
- White Sugar (organic preferred) about 1 or 2 tablespoons
- Tomato Paste (about 5 or 6 ounces)
- Sea Salt (about 1 teaspoon)
- Mustard (about 1 teaspoon if using regular prepared liquid type) or (about 1/2 teaspoon if using the dry powdered type)
- Turmeric (about 1/4 teaspoon)
- Ginger Powder (about 1/4 teaspoon)
- Onion Powder (about 1/2 teaspoon)
- Paprika (about 1/2 teaspoon)
- Garlic Powder (about 1/2 teaspoon)
- Ketchup (about 1 teaspoon)
- Option: A teaspoon of apple cider vinegar for some tangy flavor.
DIRECTIONS:
- Put all ingredients into the pot of beans “after the beans have been cooked” and stir well.
- Cook together with the beans for about 35 to 45 minutes.
- Stir every 10 minutes well.
- Taste every 20 minutes to check the flavor.
- After 20 minutes of cooking taste to see if you may need some additional sugar or ketchup or mustard. You will know because it’s up to your personal taste buds to determine this.
- You’ll know when it is done by the flavor and the thickness of the liquid. For the last 15 minutes of cooking you do not need to leave the top on the pot.
- You don’t even need the top on after adding the spices unless it is splattering all over (then just reduce the heat)
- You are looking for a nice thick liquid that isn’t too watery. If it’s too water just let it cook for a few more minutes without the pot top, to help the water evaporate.
- Look for a nice creamy consistency, like a thick gravy that sits on top of mashed potatoes.
- Check the flavor, make sure it’s good and it should be done.
Serve these vegetarian baked beans over rice or scoop them onto a piece of bread. You can put them on top of a hot dog even. But wouldn’t that defeat the whole purpose of having vegetarian beans?
This is a great alternative for people that don’t want pork in their beans at least.
I sometimes eat them with sauerkraut and mustard and bread and imagine that I’m eating a New York Hot Dog.
This is a nice way to skip the meat for a day and give your body a rest. Enjoy.
Italian Omelet Built for Two

If you’re hungry this Italian omelet will take care of that problem for you. It’s super easy to make and the recipe is below. It’s basically an “Omelette Parmigiano Italiano!” There are only a few ingredients: Eggs, Mozzarella Cheese, Sea Salt, Butter and Parmesan Cheese.
Since I eat very little animal meat lately, just some chicken on occasion and sometimes fish, in order to get my required protein lately I’ve decides to load up on eggs. I’ve looked up their nutritional profile on one of my favorite sites and noticed that they’re one of the highest “quality” proteins you can eat. I feel great, have tons of energy, and best of all have lost “all” the weight plus more that I put on while traveling and eating out all the time in Asia and Europe, including the Italian Mediterranean cruise I was on. So this large omelet didn’t hurt me at all in case you’re wondering how I can eat so many eggs. I’m no Adam Richman, that’s for sure. But I could probably get him a little worried.
So Why Seven Eggs?
Well, it’s kind or dumb actually how this monster omelet came about. I was hungry and was in the mood for an Italian Omelet. But after buying too many eggs I thought I’d better use some of them fast. So I had to make room for the 30 new eggs, and guess how many eggs were still in the fridge? You guessed it, seven. So I wondered if I can pull this off. Usually more than a 4 egg omelet doesn’t come out too well and can stick to the pan. But I was brave and tried anyway.
The picture above is the result of this crazy delicious Italian Omelet experiment. Not only were there 7 eggs, but I added a tons of Mozzarella cheese too. I must have put at least 4 big slices in this omelet. It was a little tricky but I still call it easy, so you can do it too. Even if you use 4 or 5 eggs it’s fine this isn’t a competition and you don’t have to go crazy like I did. I love eggs and Italian food so this Italian Omelet went down easy. Plus next time I’ll probably use 4 eggs and two slices of cheese. Remember when you make mistakes with eggs you can turn them into scrambled eggs, and nobody will know.
BTW, Yes I ate the whole thing myself. Hey man, no one was home! Call me a pig, I don’t care I was hungry and this was my breakfast and lunch. So say goodbye to the large Omelets at IHOP which are about $10 – $12 dollars and only half the size. And say hello to my little friend. Well my new little / big friend.
Here’s the recipe
But before you begin make sure you have a small saucepan ready to heat up about 10 Tablespoons or 6 ounces of your favorite tomato sauce.
You’ll also need a large omelet pan at least 10” or 11” (inches) wide. The one I used was 11.5” wide.
Any other type of pan probably won’t work for this since it’s so large.
Directions for: “Italian Omelet”
- In a large bowl beat 7 eggs.
- Add a pinch or two of sea salt.
- If you like pepper, add a pinch of that too, why not.
- Get a stainless steel pan warm over medium heat.
- To the pan add about 3 heaping Tablespoons of delicious butter.
- Spread the butter all around with a large Tablespoon covering every inch of the pan, especially up the sides a bit, so the eggs won’t stick
- When the butter is sizzling or it’s starting to change to a medium yellow color (it’s very hot) pour the eggs into the pan. Don’t burn the butter.
- After about 40 seconds you’ll see the edges cooking. At this point use a tablespoon and start to go around the edges with it, separating the eggs from the pan so they don’t stick.
- After another minute go a little deeper like an inch more, from the outside. Do not touch the wet uncooked eggs. Only from the bottom do this.
- Now you can sprinkle a little Parmesan cheese into the eggs that are wet.
- Next you can carefully place 2 or 3 slices of thinly sliced Mozzarella cheese into the center part of the omelet covering about 60% of it.
- After a total time of about 3 minutes the eggs should be strong enough to go to the next step.
- You can turn the flame down to medium-low if you think the pan is getting to hot, otherwise medium should be okay.
- You will need two hands now for this next part.
- Take a tablespoon in one hand as a helper hand, and in the other a spatula.
- Now loosen the eggs underneath with the spatula, carefully so you don’t break the omelet, and use the spoon too if you want.
- When you’re done take the spatula in one hand and the spoon in the other and push the spatula about almost halfway under the eggs and fold them over quickly to about one third or a bit more. You can use the spoon to help with the folding. This part takes only one second, you need to do this fast or the eggs can break
- Next, turn the pan handle to the other side and fold the eggs the same way you just did toward the center again, of about 1/3.
- Wait about 30 or 40 seconds to make sure that some of the overflow of liquid is cooking and settled. Then jab the spatula under the eggs to make sure the eggs aren’t sticking to the pan anywhere.
- Wait about a minute for the eggs to firm up more.
- Now, you can try to flip the eggs over, but this is the only tricky part of making this large omelet. You need to use the spatula and the spoon together to do this.
- If you can’t flip it you can try to cook the eggs on a very low heat for a couple more minutes, so they don’t burn, but I prefer to flip them so they’ll cook evenly.
- Now 7 eggs is a very large omelet and I have never seen someone make one before, and it’s more difficult to flip than a regular sized omelet of 3 or 4 eggs, so if you master this one then you are an omelet professional. But no cheating using non-stick pans.
- So a congratulation is certainly due if you accomplished this.
- Let the eggs cook about another minute or 2 on the other side.
- Remove eggs onto a very large dinner plate or platter.
- Top with your favorite tomato sauce and sprinkle Parmesan cheese on top of the sauce.
- Enjoy and I hope you are very hungry!
A Few Notes
Try to remember just a couple things:
- Don’t burn the butter if you can help it. But it’s better to “almost” burn the butter than having the pan too cool. If the pan is too cool it the eggs will almost always stick.
- Use a thin metal spatula to get under the eggs. This large omelet is heavy and you will need at least one if not two spatulas to fold the eggs over. If you can do it, it’s also okay to fold the eggs in half (once) instead of thirds (twice). It’s just harder to do as you get closer to the center of the pan due to the weight of the eggs.
- You can even slide the eggs onto a very large plate and then use that plate to flip the eggs. But I don’t recommend that because it doesn’t always work out too well. But you can try it if you like. You have a 50/50 chance.
- You can also just cut the omelet in half and flip each half at a time.
- Use your favorite cheese instead of mozzarella. My favorite cheese for omelets is cheddar but then this omelet would not be an Italian omelet because of the deletion of the Mozzarella!
____________________________________________________________
Comments from an old blog page called Super Sicilian Pizza
Mario’s reply to Bert G.
I see that you were already working in the late 60’s as I was just a kid buying my first slices in Brooklyn at that time.
I have to tell you that the more you make it the more you will perfect it. Getting the air bubbles to make it nice and thick takes some practice. And not burning the bottom. That’s why its so important to take a look at the bottom as shown in the pic. I love thin crust pizza but also love the thick Sicilian. I would eat about 1/3 of the tray after making it. In my book I mention that the ingredients must be high quality ones, especially the real Romano cheese from Italy not an imposter. When all the stars line up correctly one day after practicing a few times you will see that this is the real deal and what some are charging over $30 per pie lately don’t even taste as good, and their crust is not as thick and airy with those air bubbles. If you ever need some tips don’t be shy to ask. Stay well my friend!
Mario,
I too remember that first slice of Sicilian. In the late ’60s/early ’70s, I was working summers on W 27th. Oftentimes I would take off in a NY strut at lunchtime to NY Pizza Suprema. I always ordered 2 slices of regular and would eye those strange thick crust rectangular slices. I never wanted to give up the extreme pleasure of 2 thin crust slices, but one day I asked for a middle cut of Sicilian.
I remember that first bite to this day, so soft and fluffy with a crunch and more sauce and cheese than a regular slice. It was truly the best thing I had ever had. It was sauce first and then cheese, unlike all the recipes I see now of “upside down” with cheese first.
Thanks for confirming, making a couple pies tonight and next week I’ll use your recipe for Sicilian, the way we had it back then
Bert G.