
Here’s a regular Sicilian Pizza I made a while ago. I call it super because of the taste. I make these in many varieties. Sometimes with just sauce and cheese, and other times with a variety of toppings. They’re fun and easy. I’ll give you some tips and tricks in this step by step tutorial.
This Sicilian Pizza, regular New York Pizza, Chicago Deep Dish, and Calzone recipes are all in both books, Italian Cookbook and Pizza At Home DIY.
Check out my my recipe club it’s free to join and I’ll give you my secret sauces book. JOIN MY FREE CLUB to get my book secret ingredients for FREE.
Sicilian Pizza Trivia
I first learned about these Sicilian Pies back in the 1960’s as a child growing up in New York by tasting them. They were simply amazing. When I first tasted these delicious square pizza slices made by Italian guys who were obviously immigrants. Of course their heavy accents gave them away I experienced things as never before. I already knew what delicious regular thin crust NY Pizzas tasted like made by the many Italian immigrants all over Brooklyn, but these delicious thick large square made an impression on me.
They are the opposite of the regular thin crust pizzas in many ways. They are thick, but light and air bubbles inside the crust, which is crispy on the bottom but soft in the center, a nice amount of freshly grated Pecorino Romano cheese, sprinkled on top of super amazing tomato sauce, topped with fresh mozzarella cheese. An authentic pizzeria will warn you to be careful if it just came out of the oven. These pizzas can pack some heat since they bake longer in the oven.
I never thought I’d say this, but I like Sicilian Square Slices “Sicilian” as much as Neapolitan Pizza “Regular. Since I never can decide which to order I order both, or I switch back and forth. When I’m in New York City aka The City, I usually pick up one slice of each and then after I’m done, if I’m still hungry I order a third of the one that was the best at that pizzeria.
Let’s Get Down to Basics
Not everyone knows how to make them, but I do. I can make it simple for you if you’d like to learn some pizza baking secrets. I won’t go into all the details and bore you with them here in this quick tutorial. For beginners, if you’d like more info in great detail, you can find them in my Italian cookbook and make them with ease. The purpose of this tutorial is to give just enough extra tips to help you make the perfect Sicilian Pizza, considering that you know the basics of baking.
Sometimes I even turn this into a BBQ Chicken Pizza which gets lots of compliments. It’s not hard to do. You just cook some chicken breast first by itself and then cut it into small cubes and sprinkle it top of the sauce layer of this pizza before you bake it with a few drops of barbecue sauce on top of each piece of chicken. I do not make BBQ Pizza like the rest of the crowd. I love tomato sauce too much for that to happen. Most make it without tomato sauce. Mine is with tomato sauce and only BBQ sauce on top of the chunks of chicken. This way you get the best of both worlds. But that story is for another blog article.
How to Check the Pie
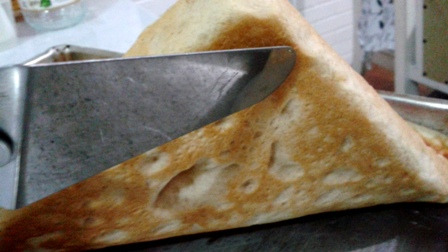
Okay you home chefs, in the picture above you can see what it should look like at the halfway mark. During the halfway point of cooking this monster you want to check on it. You don’t want to ruin this large pizza that took lots of time to make. Do it the correct way and it will be difficult to stop eating!
By lifting up the bottom and checking for the light golden color you will know that it is time to stop the baking process.
Now you can let this Sicilian Pizza Pie shell cool down for a bit before adding more sauce and the cheese. So it’s now ready to come out of the oven and cool for at least 20 minutes, before it goes back in for another 15 or 20 minutes.
You can let it cool longer if you like but will have to pre-heat your oven before you put it back in to the same temperature of around 450 degrees Fahrenheit.
This is a perfect example of what the bottom should look like when it’s halfway done. When I pull the pan out of the oven I always place it the on top of the stove for 5 minutes and “check the pie” underneath. If it looks good I transfer the hot pan to a granite counter to cool. This is perfect because the granite will absorb the heat fast without hurting the granite. You can also use a cooling rack. In this pic you see me checking this pie with a cute a little pie spatula. I get in there and loosen all the edges first and then lift in the corner to see if it’s cooked enough. If it is I let it cool and then loosen the bottom from sticking before it goes back into the assembly process. But do not crack the bread of the sauce will leak out!
The picture is at the halfway point after the first baking – before adding more sauce

Cooling time is about 20 minutes before I place more sauce, lots of cheese, a sprinkle of seasoning, and and a few drops of olive oil and a few drizzles of sauce as a final topping. By the way, you cannot see the 2nd layer of sauce I’ve added under the cheese. I’m guessing about another 8 ounces or 16 tablespoons.
In the picture below it may look like pepperoni to you but it’s not. Look closely, it’s just a little extra sauce. This pizza in the pic below is totally done, and the sauce in top is just a topping. I always cook pizzas on the light side to avoid burning the cheese. But do not fear, the crust is nice and crunchy due to the double baking with this pie.
Another reason I do not burn the cheese is because when reheated in the oven it will cook a few more minutes, and then it’s good left-overs without drying up all around. Plus, you don’t want to break your teeth on overcooked crust.

If you look at the first picture, you will see after cutting this pie how good everything looks. The only thing I forgot to do was lift up a slice after it was completely cooked for you to see the nice color on bottom. I use approximately 18 – 22 ounces of tomato sauce for this type of pie. Hope you enjoy it.
Want to Make this Even Faster?
You can actually place the cheese down first before the sauce and you don’t have to bake it twice! So it can be a one time bake for approximately 20-25 minutes at around 450 degrees F, but I prefer the double bake method since the dough is thicker. Try it both ways and see which you like better.
Have a question? You can always send me a message via social media and I’ll try to get back to you as soon as I get it.
2 replies on “”
Mario,
I too remember that first slice of Sicilian. In the late ’60s/early ’70s, I was working summers on W 27th. Oftentimes I would take off in a NY strut at lunchtime to NY Pizza Suprema. I always ordered 2 slices of regular and would eye those strange thick crust rectangular slices. I never wanted to give up the extreme pleasure of 2 thin crust slices, but one day I asked for a middle cut of Sicilian.
I remember that first bite to this day, so soft and fluffy with a crunch and more sauce and cheese than a regular slice. It was truly the best thing I had ever had. It was sauce first and then cheese, unlike all the recipes I see now of “upside down” with cheese first.
Thanks for confirming, making a couple pies tonight and next week I’ll use your recipe for Sicilian, the way we had it back then.
I see that you were already working in the late 60’s as I was just a kid buying my first slices in Brooklyn at that time.
I have to tell you that the more you make it the more you will perfect it. Getting the air bubbles to make it nice and thick takes some practice. And not burning the bottom. That’s why its so important to take a look at the bottom as shown in the pic. I love thin crust pizza but also love the thick Sicilian. I would eat about 1/3 of the tray after making it. In my book I mention that the ingredients must be high quality ones, especially the real Romano cheese from Italy not an imposter. When all the stars line up correctly one day after practicing a few times you will see that this is the real deal and what some are charging over $30 per pie lately don’t even taste as good, and their crust is not as thick and airy with those air bubbles. If you ever need some tips don’t be shy to ask. Stay well my friend!